Volunteer’s area – Leading
Videos, training links and fun to help you learn all about Diamond!


What to know before you lead
Coach & Deputy roles
- The coach arranges and leads the sessions based around the goals of the individual participants and the coach
- They check for the safety of the horses, riders and volunteers
- They take the lead when mounting and dismounting
- The deputy supports the coach and covers for the coach if absent.
Leading v side walking
If there is a leader and a side walker:
- The leader is responsible for the horse
- The side walker is responsible for communicating with the participants and the riders safety
Where there is a leader and 2 side walkers:
- The leader is still responsible for the horse
- Both side walkers are responsible for the safety of the rider
- Only 1 side walker should communicate with the rider
If there is only a leader they cover all of the above roles, however, the rider should be proficient enough to only need minimal support
Safeguarding when Side walking
- Side walkers should be in line with the participants leg; approx. 1m away
- Side walkers may support the participants ankle to keep the lower leg in a good place (if required), this often keeps the upper body in a better position
- Side walkers should give as little physical support as possible
- Side walkers should never support the participants above the knee
- Side walkers can use brief touch to aid adjustment of participants position
- Side walkers should not rest their hand on the horse or saddle
- Side walkers should not hold onto participants clothes
Leading and School Terminology
School Leading
- The correct position for the leader should be between the shoulder and head of the horse
- They should have just enough contact to keep control at all times
- There should be a small “smile” in the lead rope
- The lead rope should not be wrapped around the hand
School Terminology
There are a number of terms used during an RDA lesson that only apply in the horse world. It sometimes takes a while to learn them but if you are unsure ask your coach to clarify. If you are new, it is also a good idea to try to be leading a horse in the middle of the group, for your first few lessons, as the majority of lessons are completed with one horse following the other or copying what the previous horses have done. Do not go right at the back as when the ride “changes rein” [goes the other way] you will be at the front.
At Diamond we have 3 schools – the big school, the small school and the outdoor arena.
- Each school has the same set of letters around the outside of the school.
- These letters are used by the coach when they give instructions to the riders. E.g. At C turn down the centre of the school.
- At Diamond each letter has been given a word/or name, which is supported by a picture.
C – Cat; M – Monkey; B – Butterfly; F – Fish; A – Apple; K – Kite; E – Elephant; H – Horse. - These words/pictures help the riders [and volunteers] in lessons.

- The blue line shows the “outside track”.
- Most led RDA lessons start with horses using the “full school” and on the “outside track”
- The term “go large” is used to describe this
- The red line shows the “inner track”
Left and Right Rein
- These are the terms for telling the riders which direction they should be going in and are based on the riders hands.
- Right rein – going round the school with the riders right hand to the inside; e.g. going in a clockwise direction
- Left rein – going round the school with the riders left hand to the inside; e.g. going anti-clockwise around the school

The school has 3 imaginary lines running along the long aspect of the school.
The centre line is the one most commonly used. It is marked in blue in the picture below, and runs from A to C.
The coach will often ask the ride to change the rein down the centre of the school from A-C, or vice versa. The aim is for the rider to make the line as straight as possible.
The green and red lines are quarter lines. Sometimes riders are asked to come down the quarter line.

Tips and Tricks
How to tie a quick release knot
Extra Info
MAKATON
Click the picture below for a worksheet with some basic signs which might help you when voluteering!
Please also see the RDA site: https://www.myrda.org.uk/assets/Communicating-using-signs-A-Z-list.pdf for videos showing these and many others!
If you would like to learn even more Makaton, The Makaton Charity is a great place to start, please contact Annabel with any questions!
Annabel Bridgeman BA BSc DipSPLD MBPsS amcbridgeman@outlook.com
Ever wanted to learn some sign language to help you communicate with riders?
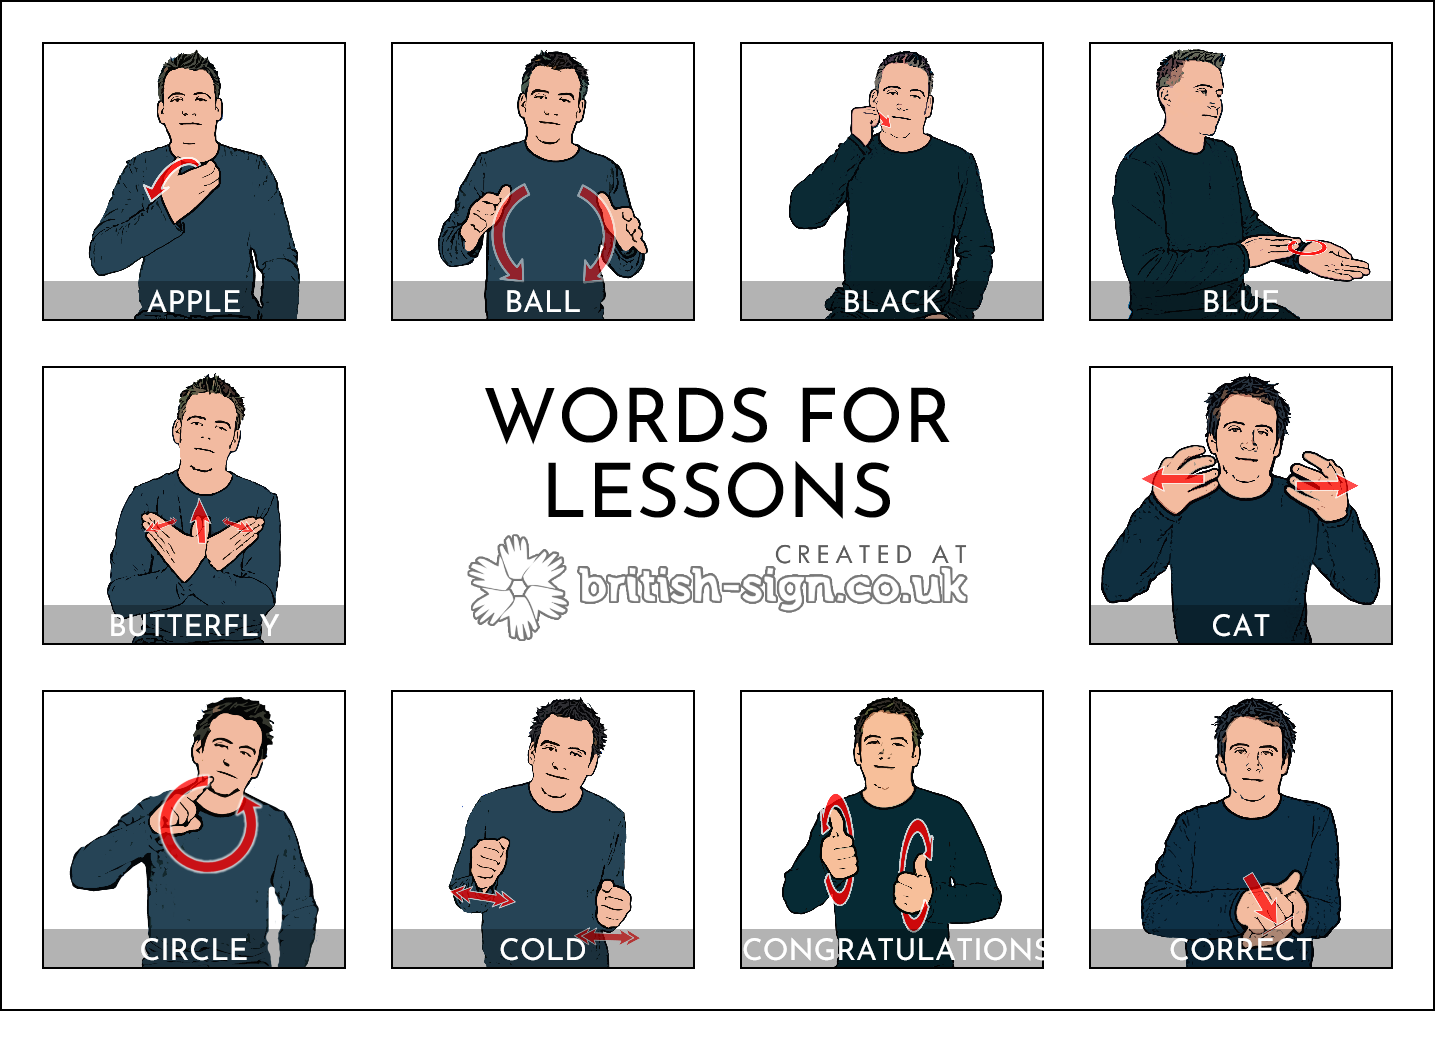
WORDS FOR LESSONS1
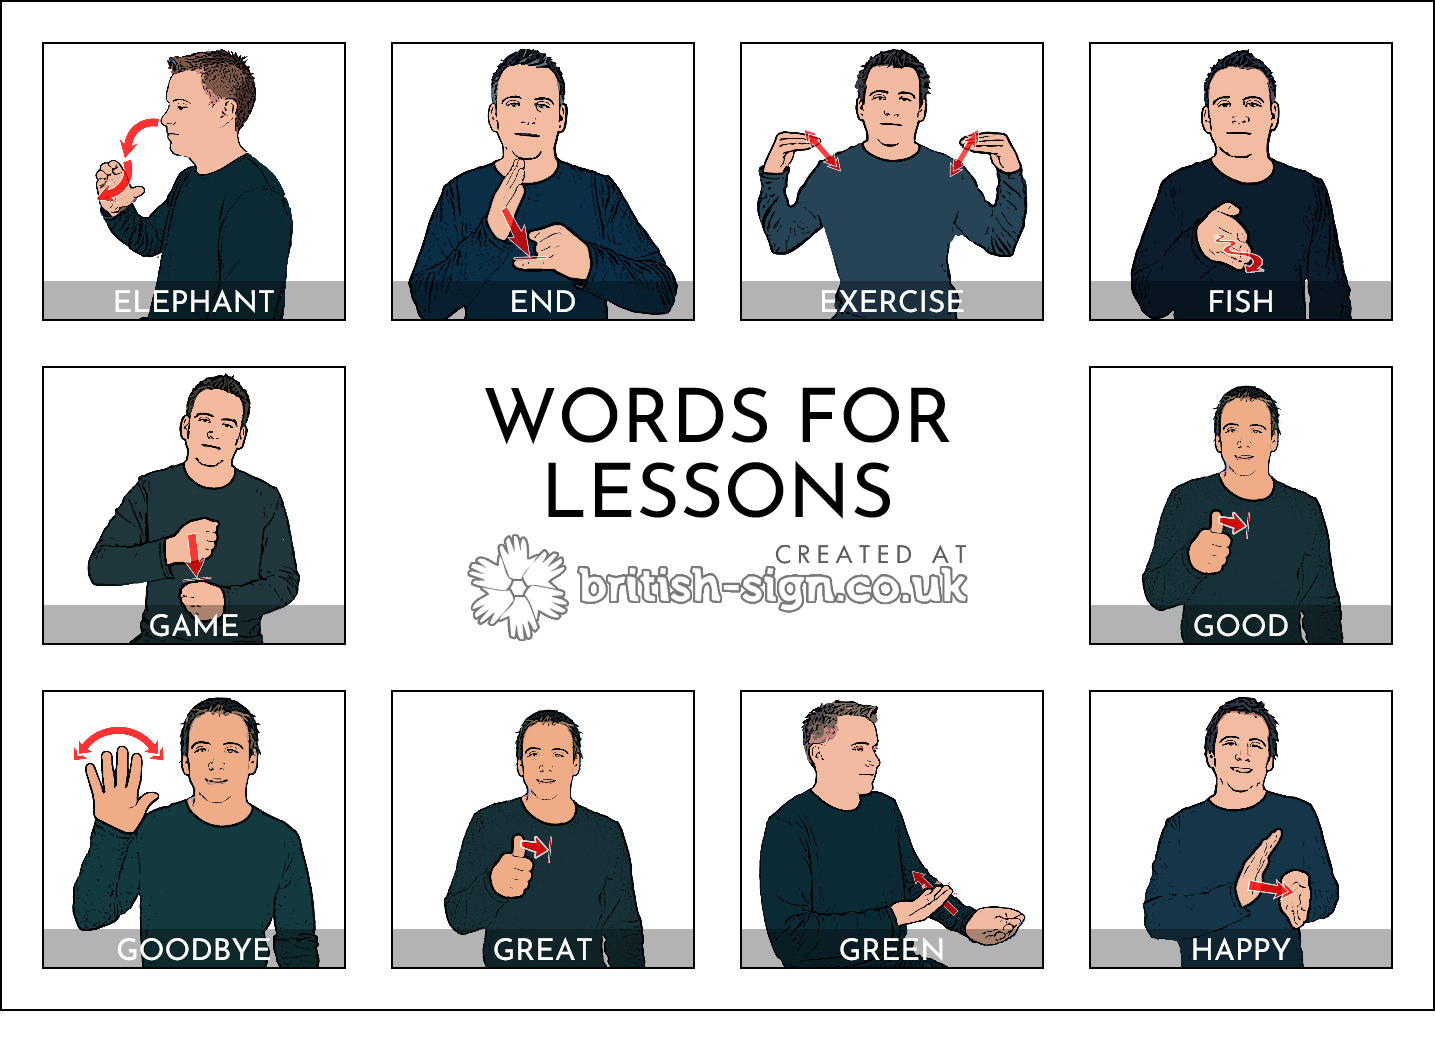
WORDS FOR LESSONS2
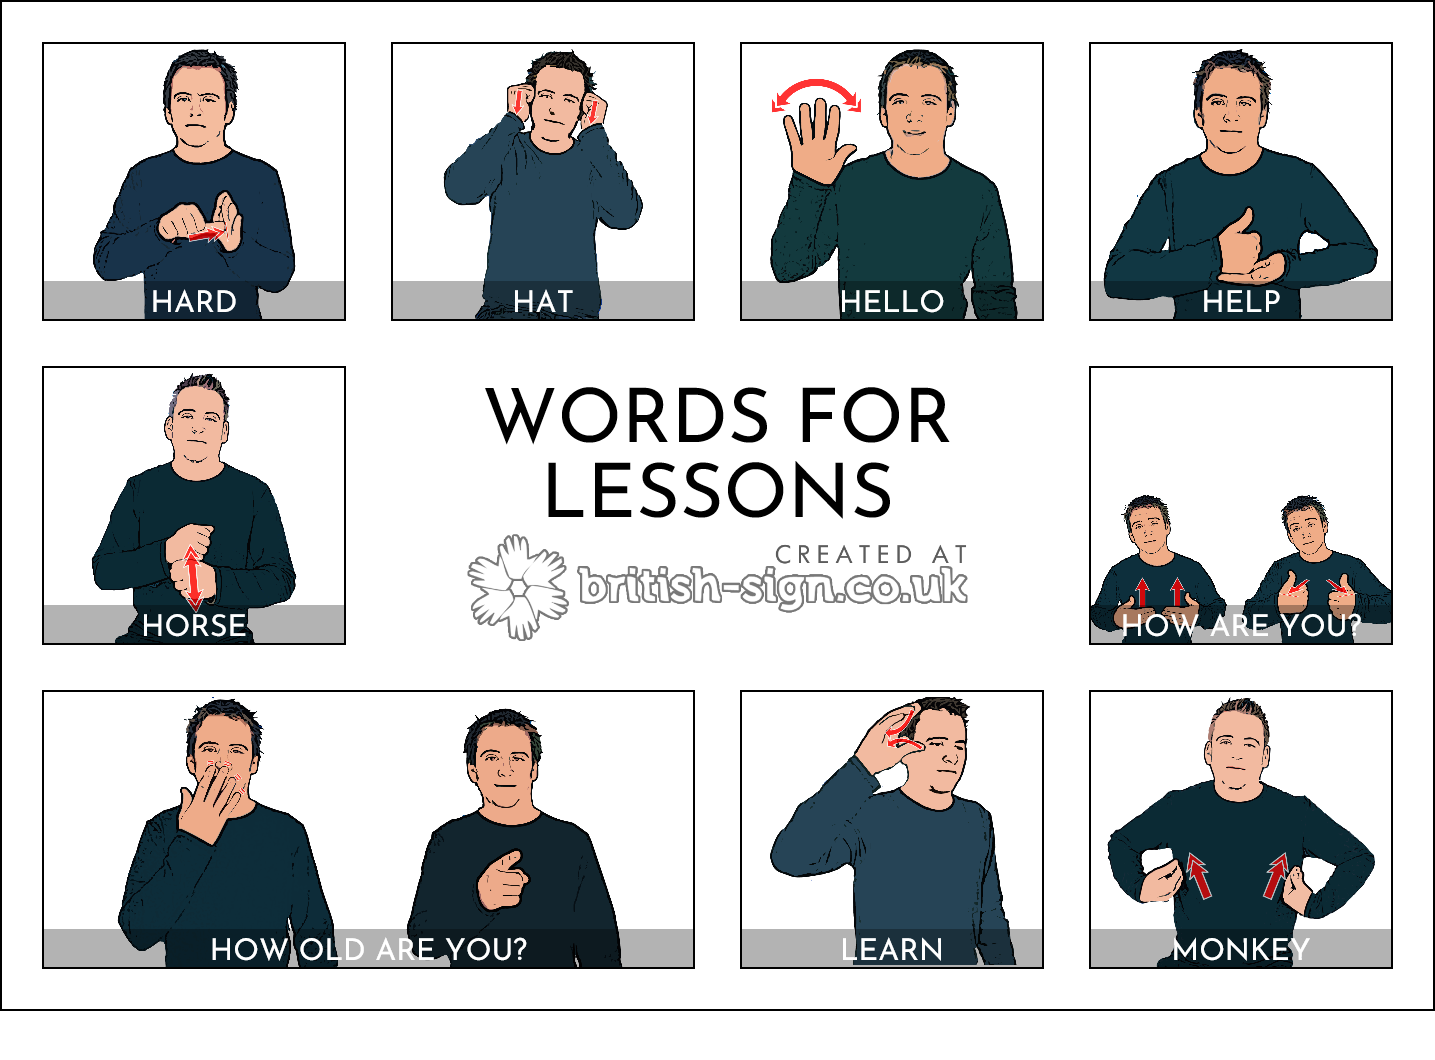
WORDS FOR LESSONS 3

WORDS FOR LESSONS 4
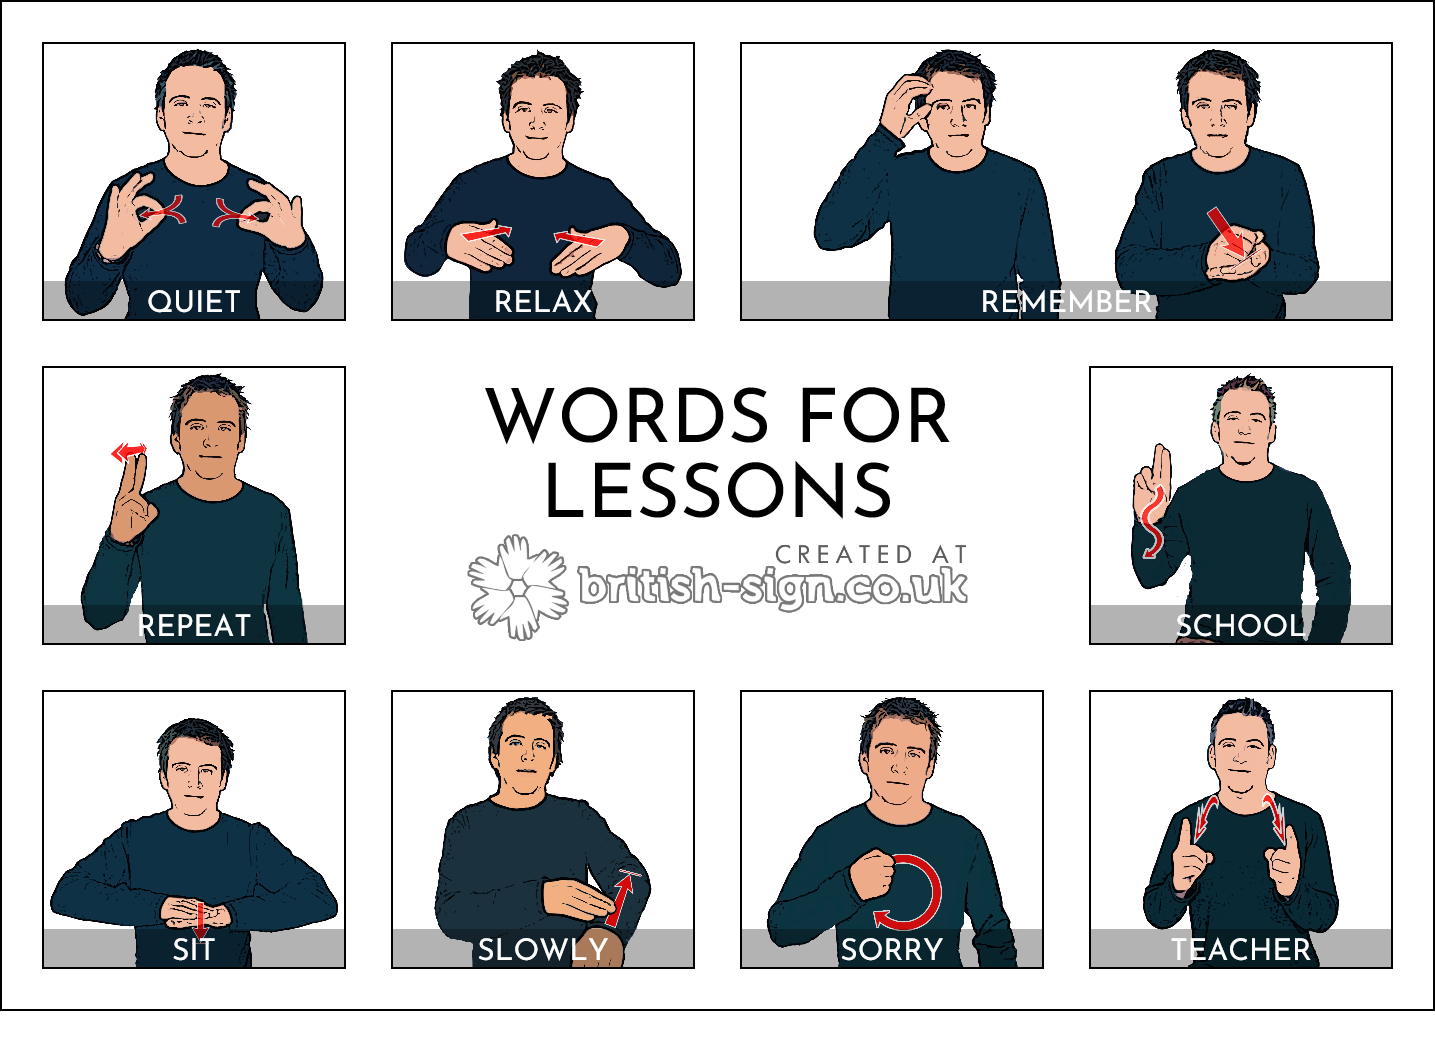
WORDS FOR LESSONS 5
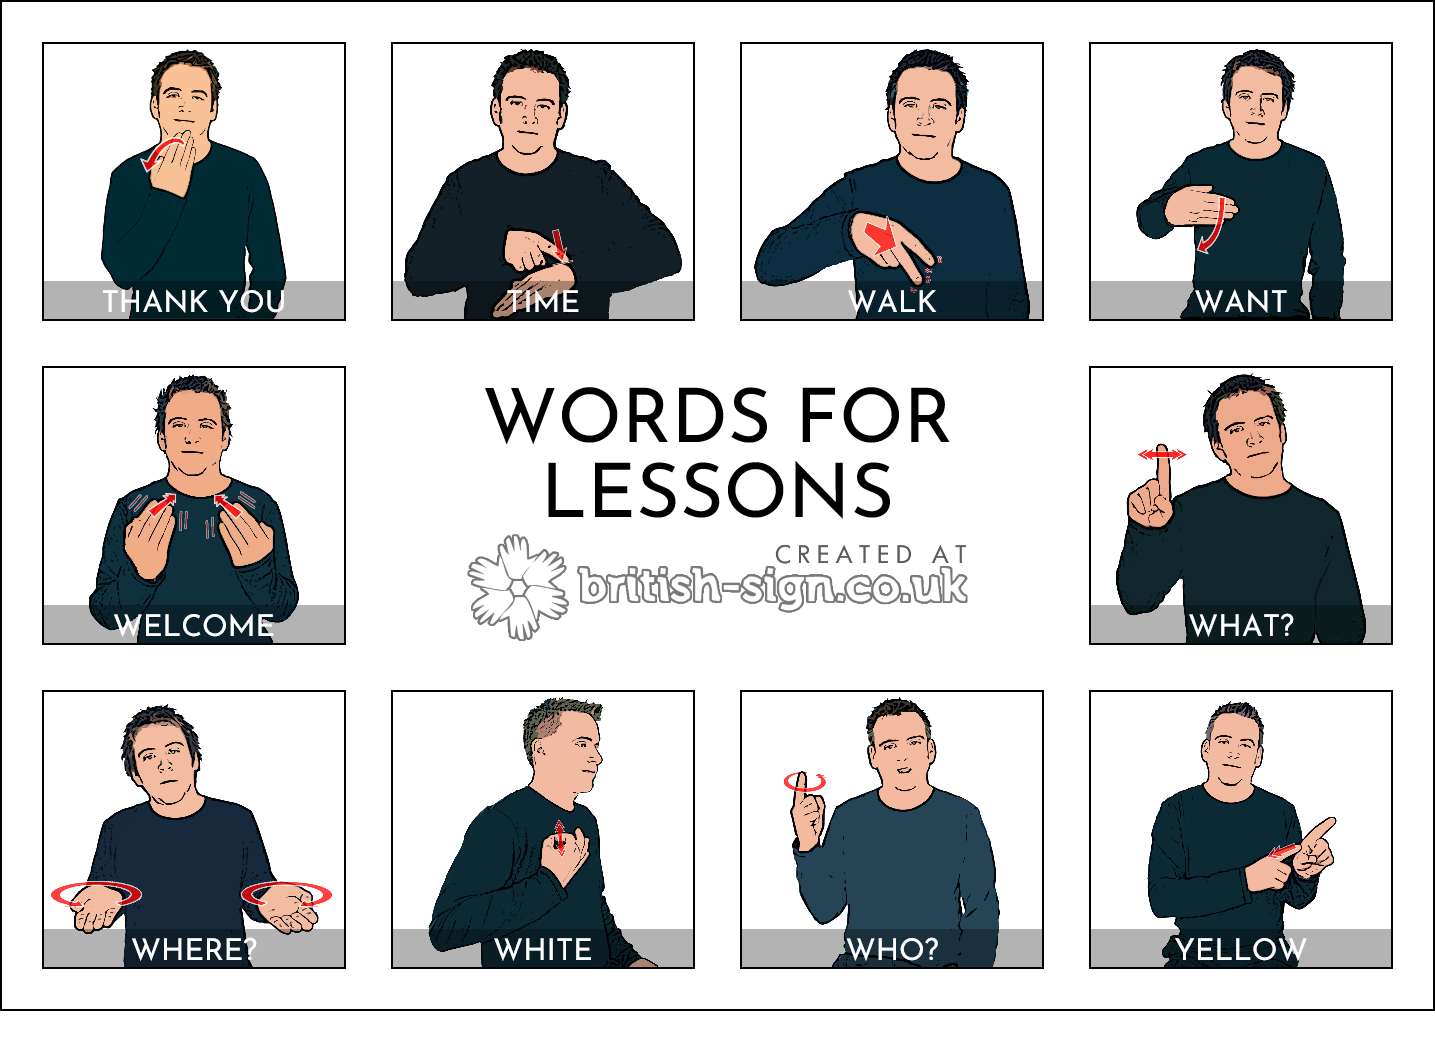
WORDS FOR LESSONS 6
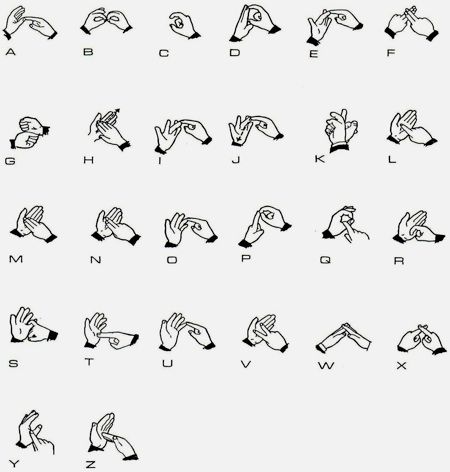
Makaton – Alphabet
Policies & procedures
- Data Privacy
- Cookies
- Website terms of use
- Code of conduct
- Safeguarding
- Horse Riding Policy for Individuals
- Complaints handling
Click the image for more safeguarding infomation

Contact us!
020 8643 7764
The Diamond Centre for Disabled Riders
Woodmansterne Road,
Carshalton, Surrey, SM5 4DT
https://what3words.com/modest.cheese.basket
(please note, if you are travelling to us we are in the LEZ & new ULEZ zone)
Other important info....
Registered charity number: 1045970.
The London Borough of Sutton, Animal Activity License, Hiring out horses, Licence Number: 22/00380/RIDE